Note : Les descriptions sont présentées dans la langue officielle dans laquelle elles ont été soumises.
CA 02924161 2016-03-18
- 1 -
POST PRODUCTION PIPELINE PROCESS FOR EDITING AND MANIPULATING 180
DEGREE FOOTAGE FOR HALF-DOME THEATERS
TECHNICAL FIELD:
The technical field of this process is the cinematic post-production field,
and in particular, post-
production for footage material destined for display in half-dome theaters,
rides and attractions.
BACKGROUND ART:
=
180 degree aerial footage can be used in half-dome theaters to give the
audience the
sensation of flying. Usually, material shot for this purpose is shot using a
cinema camera mounted
underneath an airplane or helicopter using specialized, mechanical and
electronic, camera control
and stabilization systems. Although these systems help provide camera control
and stabilization,
they are not perfect, and the recorded material can be deemed flawed or
unusable due to the
undesired effects of turbulence, the limitations of the mechanical systems,
undesired artifacts in the
image, and/or human or mechanical error.
Because of the technical challenges involved, and the unpredictability of the
weather, it can
take many flights to obtain useable material, since the slightest mistake can
be noticed by audience
members when the material is played back in a large half-dome theater.
Visual effects (VFX) may be employed to attempt to correct some of these
flaws, or
manipulate the material for artistic reasons, but the use of one visual effect
may create new problems
or destroy the work of another visual effect. For example, it may be necessary
to digitally stabilize
as well as speed up recorded material, however, speeding up the material after
it has been digitally
stabilized may introduce shakiness that was not perceivable prior to speeding
up the material.
Additionally, speeding up the material, and digitally stabilizing it,
introduces noticeable changes in
motion blur, giving an audience the sensation that the video has been tampered
with. If the video is
slowed down and later sped up, for example, the audience can clearly perceive
a change in motion
blur, and can, without any technical knowledge as to why, perceive that the
video has been sped up.
The entire post-production process for a 180 degree film destined for a half-
dome theater is
complex and unique, with numerous hidden pitfalls that are not readily
apparent even to seasoned
CA 02924161 2016-03-18
- 2 -
post-production professionals. Small oversights in the order in which, and how
post-production
processes are executed, can result in image quality degradation and post
production delays. Further,
traditional post-production pipelines are not designed to process material for
a half-dome theater and
cannot be used for this purpose without considerable technical problems.
SUMMARY
The following post-production pipeline describes how to process 180 degree
footage
destined for half-dome theaters, in an efficient manner, without compromising
image fidelity, while
at the same time allowing for creative flexibility for the director(s) and
producer(s).
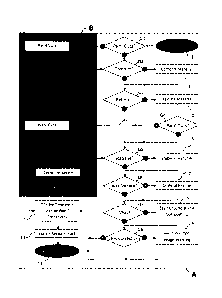
The entire process is divided into two groups as depicted in Figure 1; group
"A" and group
"B". Group "B" denotes processes that can take place in parallel with
processes in group "A", while
processes within each group must take place in the numerical order.
Fig 1: Is a flowchart of the steps comprising the pipeline process.
Fig. 1-1: Source material enters the pipeline.
Fig. 1-Q1: Source material that requires "paint outs" is identified.
Fig. 1-2: Source material that requires "paint outs" is processed.
Fig. 1-Q2: Material with a frame rate that does not match the projection
system's frame rate, is
identified.
Fig. 1-3: The material's frame rate is conformed to the projection system's
frame rate.
Fig. 1-Q3: Material requiring retiming, is identified.
Fig. 1-4: Material is retimed, as needed.
Fig. 1-Q4: Retimed material that requires "paint outs", is identified.
Fig. 1-5: Retimed material requiring "paint outs", is processed.
Fig. 1-Q5: Material requiring stabilization, is identified.
Fig. 1-6: Material is stabilized, as needed.
Fig. 1-Q6: Material requiring artificial motion, is identified.
CA 02924161 2016-03-18
- 3 -
Fig. 1-7: Artificial motion is added to material, as needed.
Fig. 1-Q7: Material requiring VFX Compositing, is identified.
Fig. 1-8: Material requiring VFX Compositing, is processed, as needed.
Fig. 1-Q8: Material requiring lens correction / image warping, is identified.
Fig. 1-9: Lens correction / image warping is applied, as required.
Fig. 1-10: Material is arranged on a master timeline. Motion blur is applied,
and transitions between
shots are created.
Fig. 1-11: Material is color corrected.
Fig. 1-12: The entire timeline is scaled / resized to match the dimensions
required by the projection
system. A mask is employed to trim any part of the image that falls outside of
the projection area.
Fig. 1-13: The resulting material is rendered out in a format compatible with
the projection system.
Fig. 2-1: Depicts how the Source Materials should be captured whenever
possible.
Fig. 2-2: Depicts how some directors may choose to capture the source material
to maximize image
resolution for truncated half-dome theater screens.
Fig. 2-3: Depicts the shape of a half-dome theater.
Fig. 2-3a: Depicts a half-dome theater and the position of the projector.
Fig. 2-4: Depicts the shape of a half-dome theater that is truncated.
Fig. 3: Depicts a 2D compositing structure based on the pipeline.
Fig. 3-1: Depicts the "Conform Precomp".
Fig. 3-2: Depicts the "Retime Precomp".
Fig. 3-3: Depicts the "Stabilization Precomp".
Fig. 3-4: Depicts the "Artificial Motion Precomp".
Fig. 3-5: Depicts the "Lens Correction Precomp".
Fig. 3-6: Depicts the "Master Timeline Precomp".
Fig. 3-7: Depicts the "Delivery Precomp".
CA 02924161 2016-03-18
- 4 -
Fig. 4-1: Depicts the vertices and splines that form the input for the
creation of an image warping
mesh.
Fig. 4-2: Depicts an image warping mesh created from the information derived
from the vertices and
splines in Fig. 4-1.
Fig 4-3: Depicts an image that is not warped by the warping mesh in Fig. 4-2.
Fig 4-4: Depicts an image that is warped by the warping mesh in Fig. 4-2.
CA 02924161 2016-03-18
- 5 -
DETAILED DESCRIPTION
The pipeline process begins with the ingestion of the source materials, into a
2D compositing
environment (Fig. 1-1) for arrangement into a composition structured as
depicted in Fig. 3. The
source material may be in any number of formats, but usually consists of
footage recorded using a
digital cinema camera or generated using 3D software. The source material may
be recorded in
R3D, MOV, DPX, TIFF or any number of other formats, and can exist self
contained in a single file,
as is the case with R3D and MOV formats, or each frame may be recorded as
individual files, as is
the case with the DPX and TIFF formats.
The source material should have a resolution of at least the resolution of the
projection
system for the half-dome theater. Whenever possible, shooting source material
at higher resolutions
than the resolution of the projection system is recommended in order to
maintain image sharpness
throughout the pipeline. For example, it can be beneficial to shoot source
material at a resolution of
6k (6144 x 3160 pixels) for a projection system that will display the final
results in 4k (4096 x 2160
pixels). Higher resolutions ensure the material retains its sharpness
throughout the pipeline, in
particular, throughout stabilization (Fig. 1-6), artificial motion (Fig. 1-7),
and the motion blur (Fig.
1-10) process.
Source material captured for projection in a half-dome theater is usually shot
with a 180
degree fisheye lens. The lens is situated in such a way that the resulting
image is circular in nature
and resembles the reflection on a silver VFX ball or a reflective garden globe
as seen in Fig. 2-1.
Using this kind of lens, the camera is able to capture what is visible within
a 180 degree POV. When
this image is projected through a 180 projection lens (Fig 2-3a) onto a half-
dome theater screen (Fig.
2-3), the image appears to envelope the audience and produce a pseudo 3D
effect. A straight line
captured using a 180 degree fisheye lens may appear curved on a flat screen,
but appears straight
when projected back in a half-dome theater.
There are times when the half-dome theater may not be a perfect half-sphere,
as is picture in
Fig. 2-4. The screen may be truncated at the top and bottom due to a number of
reasons including
structural limitations. In cases like that, a director may choose to modify
the lens of the cinema
camera in order to capture an image similar to the one pictured in Fig. 2-2
with the goal of
maximizing image resolution and aligning the image to the shape of the half-
dome. The challenge
with this technique is that it creates vast amounts of visual effects work
anytime there is stabilization
CA 02924161 2016-03-18
- 6 -
(Fig. 1-6), artificial motion (Fig. 1-7)), or "paint outs" or VFX work to be
done (Fig. 1-2, Fig. 1-5,
Fig. 1-8). Whenever possible, it is preferable to shoot the entire source
material at a higher
resolution, and avoid any cropping of the image at the moment of capture. By
recording a perfect
circular image (Fig. 2-1) and cropping the image in post-production (Fig. 1-
12) instead of during
production, the visual effects workload can be dramatically reduced.
Once the source material has been captured and selected, it is important to
identify material
that requires "paint outs" (Fig 1-Q1). This includes flare removals, bug splat
or dirt removals, and
painting out other undesirable items in the frame. A copy of said material is
made, and "paint outs"
can be performed on this material separately (Fig. 1-2), or within the Conform
Composition (Fig. 3-
1).
The frame rate the source material is recorded at should match the projection
system's frame
rate whenever possible. Source material that does not match the projection
system's frame rate is
identified (Fig. 1-Q2) and conformed (Fig. 1-3). Conforming source material is
a matter of changing
the frame rate of said material, to match the frame rate of the projection
system. For example, if the
projection system's frame rate is 60fps and we want to conform one minute of
footage, shot at 30fps,
with 1800 frames, the amount of frames would not change, but the speed at
which those frames are
played back at would, resulting in material that is 30 seconds long, with 1800
frames, playing back
at 60fps.
The Conformed Source Material is "precomped" in the 2D compositing
environment,
encapsulating it, allowing the 2D compositing program to treat it as a new,
completely self-
contained piece of footage. This "Conform Precomp" is represented by Fig. 3-1.
The results from the "paint outs" in Fig. 1-2 can be rendered out in a
lossless format, such as
DPXs, once the work is complete. These DPXs are composited back into the
Conform Precomp
(Fig. 3-1). The new frames (Fig. 3-1b) supersede the Conformed Source Material
(Fig. 3-1a), in
essence replacing them, where applicable, however, the entire Conformed Source
Material can be
left untouched in the Conform Precomp (Fig. 3-1) for reference, or in case
revisions need to be made
in the future.
For material expected to be considerably sped-up in the retiming stage (Fig 1-
4), it may be
more efficient to complete any "paint outs" after returning (Fig. 1-5),
however, "paint outs" should be
CA 02924161 2016-03-18
- 7 -
performed on the source material (Fig. 1-2) whenever possible, ensuring that
any changes made to
retiming does not require the "paint outs" and to be redone.
In the 2D compositing environment, the Conform Precomp (Fig. 3-1) is inserted
into the
"Retime Precomp" (Fig. 3-2). This allows the retiming of the entire Conform
Precomp (Fig. 3-1)
resulting in new, self contained, retimed material (Fig. 3-2a).
In the retiming stage (Fig 1-4), the Conform Precomp (Fig 3-1) is retimed (Fig
3-2a) using
retiming software, or plug-in, with motion estimation. It is important to turn
off any artificial
motion blur the retiming software may try to generate. Motion blur should only
be applied once in
the pipeline process, after all transformations have been applied (Fig. 1-10).
In the 2D compositing
environment, motion blur should only be applied to the "Master Precomp(s)"
(Fig. 3-6a). If motion
blur were applied more than once throughout the pipeline process, it would
result in degradation of
sharpness, and can result in contradicting motion blurs between processes,
giving viewers the
sensation that something is unnatural about the end result.
Material that requires "paint outs" after being retimed, is identified in Fig.
1-Q4. This
retimed material can be rendered out in a lossless format such as DPXs, and
worked on, separately,
as seen in Fig. 1-5. The rest of the pipeline can continue, while this work is
performed in parallel,
however, it is important to note that any "paint outs" performed on retimed
footage needs to be re-
done if the retiming is ever changed, or if there are any changes made in the
steps preceding it. This
is why it is preferable to do any "paint outs" before retiming (Fig. 1-2),
whenever possible.
Work completed in Fig. 1-5 is rendered out in a lossless format, such as DPXs
and
composited back into the "Retime Precomp" (Fig. 3-2). The new frames (Fig. 3-
2b) supersede the
Retimed Material (Fig. 3-2a), in essence replacing it where applicable,
however, the entire Retimed
Material can be left in the Retime Precomp (Fig. 3-2) for reference, or in
case revisions need to be
made to it in the future.
The Retime Precomp (Fig. 3-2) is inserted into the "Stabilization Precomp"
(Fig. 3-3) where
it is stabilized to eliminate any shakes, jitters, and otherwise unwanted
motion (Fig. 1-6). The
dimensions of the Stabilization Precomp (Fig. 3-3) must be large enough to
accommodate the
Stabilized Material (Fig. 3-3a) and any VFX work (Fig. 3-3b) without causing
image clipping.
CA 02924161 2016-03-18
- 8 -
Sky and Ground reconstruction (Fig. 1-8) may be required due to stabilization
and any
Artificial Motion introduced in Fig. 1-7. Parts of the sky and/or ground may
be missing and need to
be reconstructed and tracked onto the Stabilized Material inside the
Stabilization Precomp (Fig. 3-
3). It can help to add any Artificial Motion (Fig. 1-7) into the "Artificial
Motion Precomp" first
(Fig. 3-4), before knowing how much Sky / Ground Reconstruction (Fig. 1-7)
needs to be completed
in the Stabilized Precomp (Fig. 3-3). Any additional VFX's, such as the
addition of 2D or 3D
elements can be composited into the Stabilization Precomp (Fig 3-3b).
Once stabilization is complete, the Stabilization Precomp (Fig. 3-3) is
inserted into the
"Artificial Motion Precomp" (Fig. 3-4) where Motion is artificially re-
introduced (Fig. 1-7) by
rotating, scaling, and translating, as desired, creating the "Artificial
Motion Material" (Fig 3-4a).
This usually means simulating the left and right banking of an airplane to
give the audience the
feeling they are floating effortlessly in the sky. The dimension's of the
Artificial Motion Precomp
(Fig. 3-4) is set to the dimensions of the Source Material, clipping away any
excess imagery
introduced by the expanded size of the Stabilization Precomp (Fig. 3-3)
Source Material is usually shot with an extremely wide lens with a 1800 POV.
Due to the
extremely wide viewing angle, it can be difficult to get close enough to
certain subjects for them to
appear large enough on screen. For example, it may be impractical, and even
dangerous, to get
close enough to a jet airplane, while shooting from another airplane, using a
lens this wide. A lens
with greater zoom may be used in this situation to allow a safer distance
between the camera and the
jet while filming. Lenses with greater zoom, however, have a narrower viewing
angle which results
in distortion, reduced panoramic visibility, and reduced image sharpness at
the edges of the
projected image. In order to greatly reduce this distortion, increase
panoramic visibility, and
sharpen the image at the edges, image warping may be employed.
As an example, source material usually shot with an 8mm lens to achieve a POV
of 180
degrees, might be shot using a 15mm lens, instead, to achieve greater zoom. To
correct lens
distortion, increase panoramic visibility, and increase the sharpness at the
edges when the image is
projected back in a half-dome theater, a warping mesh (Fig 4-2) can be
created, usually defined
through vertices and splines (Fig. 4-1). Fig 4-3 and Fig 4-4 demonstrate what
the material might
look like before and after the warping mesh is applied. The image may look
strange after the
warping is applied, but once it is projected in the half-dome theater, the
reason for the warping
becomes clear, as it will have reduced distortion, increased panoramic
visibility, and increased
CA 02924161 2016-03-18
- 9 -
sharpness at the edges of the projected image. It is preferable to shoot all
source material with a 180
degree lens, but this process offers an alternative when greater zoom is
required. the warping mesh
(Fig. 4-2) can vary from lens to lens.
To apply Lens Correction / Image Warping (Fig. 1-9) the Artificial Motion
Precomp (Fig. 3-
4) must first be inserted into the "Lens Correction Precomp" (Fig. 3-5). Lens
Correction / Image
Warping is then applied to the Artificial Motion Precomp creating the "Lens
Corrected Material"
(Fig. 3-5a)
All Lens Correction Precomps (Fig. 3-5) are inserted into the "Master Timeline
Precomp"
(Fig. 3-6) and become "Master Precomp(s)" (Fig. 3-6a). The Master Precomps are
arranged in the
order chosen by the director. Motion blur is applied to each Master Precomp,
allowing for the 2D
Compositing environment to calculate the motion for the image resulting from
all pre-comps,
processes, visual effects, and transformations within each Master Precomp.
As each Master Precomp (Fig. 3-6a) is created on the Master Timeline Precomp
(Fig. 3-6),
each Master Precomp (Fig. 3-6a) can be rendered out in a lossless format, such
as DPXs, and sent
to have "Color Correction" performed on it (Fig. 1-11). The Color Correction
process can occur in
parallel to the remaining pipeline process. Once Color Correction is
completed, the results are
rendered in a lossless format, such as DPXs, and sent back to the Master
Timeline Precomp (Fig. 1-
10) where the new DPX material supersedes / replaces its corresponding Master
Precomp (Fig. 3-
6b). The original Master Precomp(s) (Fig. 6-6a) can be kept in the Master
Timeline Precomp (Fig.
6-6), albeit hidden, in case changes need to be made, to it, or any of its
underlying precomps. If
changes are made to a Master Precomp (Fig. 6-6a), or any of its underlying
precomps, after the
Color Correction (Fig. 1-11) process has taken place, the color correction
process will need to be
redone.
Transitions can be performed between Color Corrected Material (Fig. 3-6c) in
the areas
where they overlap on the Master Timeline Precomp (Fig. 3-6). This might be
simple fades between
Color Corrected Material, or more complex transitions, at the liberty of the
director. If needed,
transitions can be worked on using the Master Precomps (Fig. 6-6a), as stand-
ins, for the Color
Corrected Materials (Fig. 6-6b) before the Color Correction process (Fig. 1-
11) has taken place,
however, it may be more efficient to wait for the Color Corrected Materials to
be ready, since
CA 02924161 2016-03-18
- 10 -
applying transitions to the Master Precomps (Fig. 6-6a) requires more
processing power and can
take more time.
The entire Master Timeline Precomp (Fig. 3-6) is inserted into the "Delivery
Precomp" (Fig.
3-7) where it is scaled to match the dimensional requirements of the
projection system (Fig. 3-7a).
A "mask" is employed (Fig. 3-7b) in order to black out any parts of the image
that may cause "light
leakage", by the projection system, into areas off-screen.
Once all materials have been processed, and the Delivery Precomp (Fig. 3-7) is
finalized, the
entire Delivery Precomp can be rendered out in the format required by the
projection system. This
is usually a DPX sequence of the entire project.